Before the list moved to the EBU, the last addition was the Panasonic AG-HPX250, which is retailing around £3,600 plus VAT. It is a direct rival to the Canon XF300 and XF305 (£4,400 and £5,040 +VAT respectively), and the lowest cost camera on the list. Its form factor makes it particularly suitable for observational documentaries. We have done a side-by-side comparison of the HPX250 and XF305 on our Canon XF Notebook site.
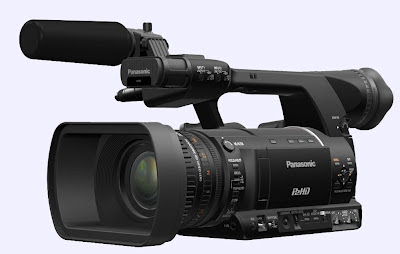
Panasonic AG-HPX250 Camera
The HPX250 has three 1/3-inch, MOS sensors at full-HD 1920x1080 (2.2 megapixels). The HPX250 is 50Hz/60Hz switchable so you have a choice of 25p, 50i, 30p, 60i and 24p. It records AVC-Intra, DVCPRO HD, DVCPRO50, DVCPRO25 and, should you need it, DV on to P2 cards. This means it can record up to 10-bit 4:2:2 and 100Mbps. And if that is not enough, you have an HD-SDI output for even higher quality recording to a separate field recorder.
The camera’s form factor is nothing new compared to the typical camcorder of the last six years, with a viewfinder (EVF) at the rear and pop-out LCD screen on the side. The handle on the top houses most of the audio controls and the two XLR audio sockets. This camera neatly fits into the Panasonic range. If you are a HVX200 owner looking to upgrade or add to your kit, the HPX250 would feel familiar and be an easy transition.
It weighs 2.5kg (5.5lbs), a little lighter than the 2.7kg Canon XF305, but neither are shoulder mounted, which will mean the usual aching arms and shoulders on prolonged shoots.
Lens check
Most manufacturers have ditched the separate iris control on a little fiddly dial (as seen on Sony's Z1). Iris is where it should be – on the barrel of the lens behind the zoom and focus. The iris has a good positive feel to it and opens to F1.6, but as you zoom in it will ramp down to F3.2 at full telephoto.

Focus, Zoom and Iris control
The camera has a good 22x optical zoom from 3.9mm-86mm, which is equivalent to a 28-616mm lens on a 35mm DSLR. There is also a 2x, 5x and 10x digital zoom.
The focus ring, however, was a bit of a disappointment, coming in a non-stop infinity ring mode only. I would have expected Panasonic to copy Sony (EX1) and Canon (XF300/305) and offer the option of a focus ring with hard end stops for a more repeatable focus pull. But, what is there is fine with no lag or stickiness.
If I have to be picky, one problem is that Peaking only comes in white. I always prefer to use a red peaking as it makes focusing so much more obvious and a lot easier.
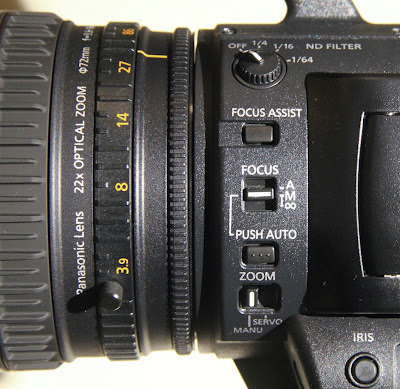
That said, to help with focusing you do get the usual Push Auto button, which switches the camera from manual to auto focus while you press it down. Plus, there is a Focus Assist button that magnifies the centre of the screen to help you check your focus. This feature shouldn’t be confused with the MF ASSIST mode available in the menus, which increases the sensitivity of the focus ring for fine tuning your focus. If all that wasn’t enough, there is also the focus bar that indicates how sharp the image is – the longer the bar the more in focus you are. Nudge the focus ring too far and the bar starts to shorten as you go out of focus.
Gain control
Gain comes in the usual low, medium and high setting from 0dB to 18dB in 3dB increments. If you are in the dark with no possibility to use lights there are super gain options of 24 and 30dB.There is no negative gain, which seems to be pretty standard on most rival cameras, and there is no way to limit the auto gain, which is a bit disappointing.
Shutter framed
The shutter control design and implementation is a bit worrying. The shutter / F.rate dial is used to change the shutter speed and frame rate – this seems very dangerous. As you turn the dial it goes from shutter to synchro scan then Frame rate – and finally lock. Being lockable is useful to prevent accidentally changing anything, but the lock also activates after 12 seconds of inaction. This made changing things annoying and fiddly – hesitate too long and you have to unlock again.
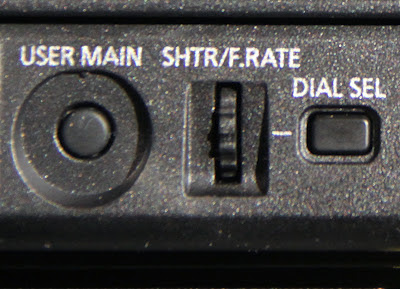
Shutter and Frame rate on the same control
But, I really do think it is a bad idea to have both shutter and frame rate on the same control - these two things need to be kept separate. If you weren’t paying attention or a beginner mixed up their shutter speeds with their frame rates – it could all end in tears.
There are, however, a wide range of frame rates to choose from, useful for off-speed (slow motion or fast motion) effects.
Frame rates
50Hz mode | 59.97Hz Mode |
1080p 1/2/4/6/9/12/15/18/20/21/ 22/23/24/25 frames per second 720p 1/2/4/6/9/12/15/18/20/21/ 22/23/24/25/26/27/28/30/ 32/34/37/42/45/48/50 fps | 1080p 1/2/4/6/9/12/15/18/20/21/ 22/24/25/26/27/28/30 frames per second 720p 1/2/4/6/9/12/15/18/20/21/ 22/24/25/26/27/28/30/ 32/34/36/40/44/48/54/60 fps |
ND filters
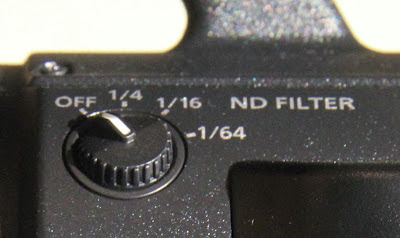
The HPX250 has the now almost standard three ND filters, coming in at 1/4ND, 1/16ND, and 1/64ND, controlled by a rotary dial (as pictured below).
Exposure
The HPX250 comes with two sets of zebras that can be set from 50% to 109% in 1% increments, which is nice. You can see Zebra1 and Zebra2 at the same time, just Zebra1 on its own, or you can choose the ‘spot’ option and see the level between Zebra1 and Zebra2. I’m not sure if I’d use the spot function but some may find it handy.
There is also a useful Y get function that you can assign to an assignable button. It will show the brightness at the centre of the screen – making the camera a useful spot meter.
New cameras now have a waveform monitor and vectorscope. I like to use my waveform to check on black and white crushing and the vectorscope can be handy when doing a white balance – to confirm you’ve done it right.
The camera does have a Full Auto Mode – or panic mode as I like to call it. In this mode the camera switches Focus, Iris, gain and white balance to Auto, but not Shutter and audio. This is different from Sony and Canon where the Auto Mode controls Iris, gain, shutter and white balance.

Full Auto or Manual
If you are a wedding videographer or do red carpet events, you’re used to flash guns going off around you. Unfortunately, if you are recording video those flashes can cause problems. This is called Flash Banding and you’ll see the brightness at the top of the screen won’t match that at the bottom. The HPX250 does have a very interesting feature called Flash Band Compensation or FBC. This compensates for and minimises the banding when a flash photo is taken in the camera’s vicinity.
White Balance
The HPX250 has the usual preset white balances set to 3200K and 5600K – they have made it easy to toggle between them by pressing the AWB button. You also get the standard A and B manual white balance memories. However, the B memory can be assigned to do an Auto white balance or if you prefer you can assign auto to one of the user buttons.
The camera also has the option to do a black balance by holding down the AWB button for two seconds. I suspect a few operators will do this by accident – but it certainly won’t hurt to do an extra one every now and then.
Audio
There are no big surprises with the audio: two XLR sockets, which can be independently switched to line or mic input with switchable phantom power (+48v). It will do the usual 48KHz at 16 bits – but it is nice to see four channels are available, even if only to use as a back up.
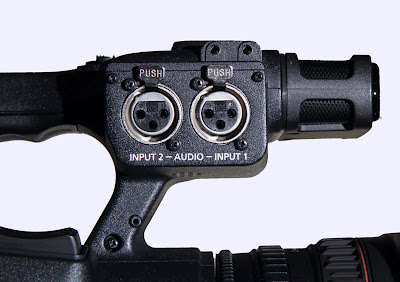
Two XLR sockets on the HPX250

Line and Mic level selection - with 48v Phantom power
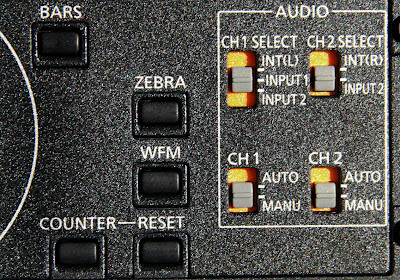
Audio input/output selection
Often the audio volume indicator is a bit small at the bottom on the screen – but you can assign MAG A.LVL to a user button and magnify the meters on the LCD screen – which is a nice touch.
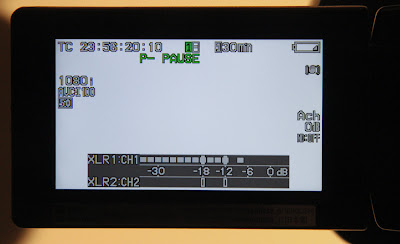
Audio levels - loud and clear
Moving around the menu is simple with the joystick like Operation lever on the side of the camera. Menus across all the manufacturers are fairly similarly laid out these days – which makes finding your way around pretty easy.
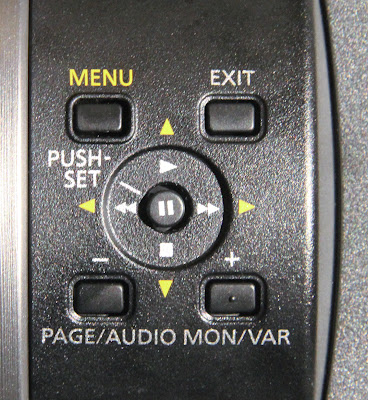
Easy joystick operation to navigate the menu
Recording media
Two P2 card slots
The HPX250 has two P2 card slots. P2 isn’t the cheapest recording media, but it is very reliable and unlike Compact Flash has “write protect” to stop you accidentally deleting your media.
However, you need to factor the cost of P2 into the purchase price. A 32GB P2 card is around £375 inc VAT while a 64GB card could set you back £550 inc VAT, although there are good deals if you buy a couple of 32GB P2 cards with the camera.
In comparison a 32GB Compact Flash card for Canon's XF305 would be about £95 inc VAT.
Recording times for HD 1080i, 720p
Recording Format | Recording time on 32GB card | Recording time on 64GB card |
AVC-I 100 DVCPRO HD | 32mins | 64mins |
AVC-I 50 | 64mins | 128mins |
Recording times are for HD 1080i and 720p | ||
The camera works in relay recording mode – first recording onto one card and then on the next once the first is full. With hot swapping you could keep recording until your battery runs out.
The Pre-Rec option is one of my favourite features of tapeless recording. If you’re worried you’ll miss something then switch on the pre-rec and you will not only get the video after you’ve hit the record button but also the three seconds before too. Everyone will think you are psychic.
For those of you who want to do timelapse there is interval recording – plus one shot (frame recording) for animation.
The modes to be wary of are loop and one clip recording. In loop recording mode the empty space on card A is filled then it moves onto card B. When B is filled – the camera does not stop but goes back to card A again and overwrites what it recorded earlier… then back to overwrite card B – ad infinitum. I can’t think of a use I would have for this. I suppose if you have no idea when an event will happen you could leave the camera in loop mode. But, you would have to ensure you had stopped loop recording once you’ve got what you want – otherwise the camera will head back and overwrite it.
I have had a few trainees who don’t like the fact their video is split into individual clips each time they start and stop recording. So, I guess the ‘one clip recording’ option is for them. In this mode the camera compiles all your video into a single clip.
This feature worries me a lot and I won’t be recommending it to my trainees. Imagine if you do 20 shots in the normal way and one is corrupt. That has happened to me. It is annoying, but at least I still have 19 healthy clips. I assume that if I used the one clip recording option, I would have had one large corrupted file. No, this just sounds like a bad idea.
As well as P2, the camera also uses SD/SDHC cards for recording and loading scene and user files and uploading metadata. This is handy if you have more than one camera and want to swap and synchronise settings. Or maybe your colleagues have sticky fingers and like to change camera settings – this way you can save your settings and load them each time you shoot.
Scene files
If you prefer to tweak the look of your images before the edit, then Panasonic offers six scene files. F1 is for normal everyday shooting; F2 for shooting under fluorescent lighting; F3 for increasing the range of resolution, colour and contrast; F4 increases the contrast in dark areas (increasing black stretch); F5 gives a film look with contrast tweaked; while F6 gives a film look with dynamic range tweaked.
Scene File options
I must admit I prefer to do very little in the camera to change the look of my pictures. I think if possible you should do that sort of thing in post.
Time code
One advantage of the HPX250 is the inclusion of Timecode in/out connectors for synching timecode across cameras. If you regularly work with more than one camera and have to synch them up later in the edit – synching with time code speeds up the process.
Time code in/out and Genlock
OK so when did you last use User Bits? I’m starting to wonder why manufacturers still include them as I don’t know anyone that uses them. But, at least Panasonic has found a good use for them – to record your frame rate choices. But if your NLE doesn’t import that information – then it is rather academic.
Who will buy
If you need 100Mbps in a small, relatively inexpensive camera. This is definitely worth a look.
I was training at a production company last week and they were shooting on a Sony EX3 and a NanoFlash because the broadcaster had stipulated recording at 100Mbps. Now the EX3 is a good camera (if a little old) and the NanoFlash does a good job – but for observational documentaries that was a lot of weight to be carrying around. The XF300/305 was no use – as they record at 50Mbps. In that case, the Panasonic HPX250 seems a no brainer. Not too heavy and no external recorder to worry about - although some broadcasters won't accept its 1/3-inch sensors as HD.
The Flash Band Compensation is a fantastic feature for wedding videographers or anyone covering red carpet events with lots of flash photography.
The genlock and timecode in/out features are a boon for anyone thinking of working multicam either on location on in a studio through a vision mixer (its main rival, the Canon XF300 doesn't have them, you have to spend extra on an XF305).
The Panasonic HPX250 is an interesting camera and certainly worth shortlisting if your budget is less than £5,000.
[[UPDATE: Panasonic has released 18 new, free, downloadable scene styles for the HPX250]]
The Panasonic HPX250 is an interesting camera and certainly worth shortlisting if your budget is less than £5,000.
[[UPDATE: Panasonic has released 18 new, free, downloadable scene styles for the HPX250]]
By Christina Fox
-------------------------- In response to comments - some setting is currently preventing us from adding a comment below - so we're adding this comment here:
OnThePulse said it doesn't do 1080p, but according to Panasonic (in the HPX250 manual), the variable frame rates it does in 1080p are: 12, 15, 18, 20, 21, 22, 23, 24, 25fps in 50Hz mode, and 12, 15, 18, 20, 21, 22, 23, 24, 25, 26, 27, 28 and 30fps in 60Hz mode.
Jonathan, thank you for your kind remarks. We agree about the price of P2, but given the cost of the camera, it can still make financial sense if you get a bundle deal and manage you media very carefully.


What a great, thorough, balanced review. It obviously took time and trouble to test and share the findings. Congrats. My only real problem is the cost of the P2 media. It is indeed a major disadvantage of this recorder. You should launch a Europe wide search for Users of User Bits.
ReplyDelete\i use one .. excellent camera but your mistake is 1080p - which it doesn't do, only 1080i. Its sweet spot though is 720p @60fps. Full drs control is available, and with Cine-D (f6) you get the film look without having to tweak it in post - just apply a broadcast filter and its good for broadcasting.
ReplyDelete