Showing posts with label Convergent Design. Show all posts

March 27, 2013

Convergent Design Odyssey7 + 7Q


A full-featured 7.7-inch OLED monitor that can also be a high-quality recorder (for Avid DNxHD, raw and 4K formats) is the attraction of Convergent Design’s adaptable new Odyssey7 and 7Q products.

As a monitor, it costs from $1,295, with the recording capabilities available as optional upgrades (online licenses for the various formats, such as DNxHD). Given that some users might only need a format like Arrirraw for a few days shooting, the licence for this will also be available for daily rental.

December 11, 2011

Review: Blackmagic Design HyperDeck Shuttle recorder

[UPDATE: Matt Grant (@MGcam on Twitter) has won our Blackmagic Design HyperDeck Shuttle competition. Congratulations Matt]


[UPDATE 2: Blackmagic has released new HyperDeck Shuttle 2, which adds ability to record Avid's DNxHD compressed format]

There are now quite a few field recorders available to allow you record higher quality video from your video camera or DSLR. I reviewed the Ninja not long after it was launched and really liked it. The one thing missing was HD-SDI but that has been fixed with the introduction of the Samurai (or the addition of Atomos new Connect connvertors, which includes an HD-SDI to HDMI version). Convergent Designs’ NanoFlash has been around the longest, and is often seen attached to a Sony EX1 or EX3 camera, there are also the AJA KiPro miniSound Devices Pix recorders and Fast Forward Video's sideKick, as well as several more expensive systems from the likes of Codex Digital, Cinedeck, and Convergent Designs (the new Gemini 444).

HyperDeck Shuttle with Solid State Drive

But, if you want the ultimate in quality, then being able to record an uncompressed picture should be the way to get it, and some of the high-end recorders allow that, but there is a cheaper way, which is why I was keen to test out Blackmagic Design’s HyperDeck Shuttle, an uncompressed portable recorder retailing around £250/$345.

First Impressions

When you get it out of the box the HyperDeck Shuttle feels a bit, well, minimalist. If it came in white you’d probably think it was an Apple device. In fact it is black and machined out of a solid block of aircraft-grade aluminium with seven buttons and six sockets.

Record - transport control - DISP  - power buttons

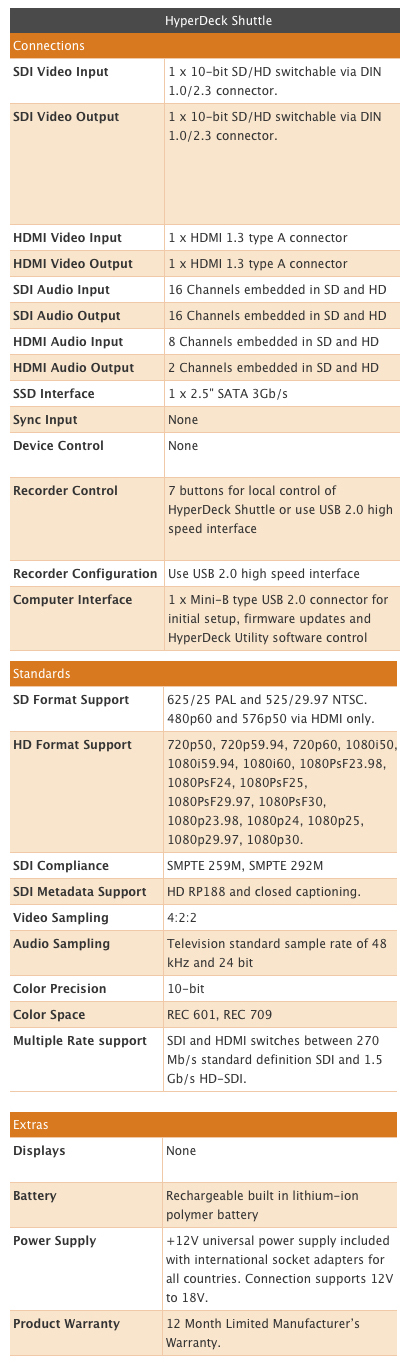
First of all, it doesn’t record in a range of selectable formats. So, there are no menus to dive in to as there is nothing to change. What the Hyperdeck Shuttle does is record 10-bit uncompressed video from your camera’s SDI or HDMI socket, plus eight channels of embedded audio in HDMI or 16 channels over SDI, and just bundles it up in a .mov QuickTime wrapper. It recognises whatever SD or HD format you are using

To give you some idea of file sizes, I recorded a minute of video using my Canon XF305 (at 50Mbps). When I checked on the CompactFlash cards the one minute (MXF file) was 391.7MB. 

One minute MXF file = 391.7MB

The same one minute on the HyperDeck Shuttle was 8.46GB.

One minute uncompressed video file = 8.46GB

It brought home just what my camera is capable of and how much compression my video is normally subjected to. If you intend to do a lot of post-production work on your video then recording straight to the HyperDeck Shuttle is a sure way of hanging on to all your data. You could always use the video on the CompactFlash for the offline edit, as proxy files or, at a pinch, backup.

But, with each minute taking up over 8Gb, I would only get about 15 minutes on a 128GB drive. So, you’ll have to plan ahead on how to handle the data. You could buy enough SSDs to get through a day or have a data wrangler on site to backup the SSDs as you go. Either way you will also need a large, fast drive to store all this data once you start editing.

The HyperDeck Shuttle does not come with a drive to record video so you must factor this into the cost. The review model I used came with a 2.5-inch (laptop size) 128GB Kingston Solid State Drive (SSD), which retails at around £120 (about $230 in the US), and format it using HFS+.

Kingston 128GB SSD - holds about 15mins of uncompressed video

Spinning disk drives are not recommended, as they are not capable of writing at the required speeds. In fact, not all SSDs are up to the job. If you go to the Blackmagic FAQ page you’ll find the current list of recommended 3Gbps SATA drives. At the time of writing these were:

1.              OCZ 240GB Vertex 3
2.              OCZ 480GB Vertex 3
3.              Crucial 256GB C300
4.              Kingston 64GB SSDNow V+
5.              Kingston 128GB SSDNow V+


Plugged In

The HyperDeck Shuttle comes with two HDMI sockets and two SDI sockets for video in and out. Whether you feed video in for recording by either HDMI or SDI, you can plug a monitor into either HDMI or SDI out socket. If you are of a nervous disposition you probably will want to plug in a field monitor to check on what is being recorded. However, there will be nothing on screen to confirm it is recording, how much it has recorded and how much disk space is remaining. This would have been useful – although if the SSD LED is lit, that indicates something is happening, and there is another LED to show that you are getting a video signal.

Power, HDMI in and out, SDI in and out and mini USB socket
(click on these images to enlarge)

How are you supposed to know when the SSD needs changing? Well, you need to keep an eye on the stop button. Once it starts flashing you have three minutes recording time left. Once the disk is full it obviously stops recording, the red recording light goes out and the green SSD indicator light stops flashing.

There is also a mini USB socket on the Shuttle. I wrongly assumed I could plug the Shuttle into my Mac and use it as a dock to review the video on the removable drive. In fact you will need to buy a separate dock for the SSD.

The USB is there to allow remote control of the device and to enable software upgrades. What I didn’t realise when I started the review was that this was something I needed to do.

When it first arrived I plugged in the HyperDeck Shuttle using an HDMI cable into my Canon XF305. But, the HyperDeck Shuttle was having none of it. It did not recognise the camera and/or video signal. It just would not record. After a call to Blackmagic they suggested the unit needed a software upgrade.

The first thing to do is go to the Blackmagic Site and you’ll see a link to download the Blackmagic Hyperdeck Utility.

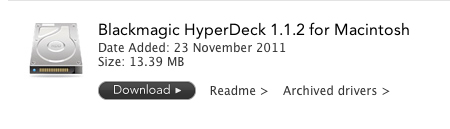
Download for the utility to check for and install driver updates


I couldn’t see a download for a Windows PC, only for a Mac. The utility was only 13.4MB so didn’t take long to download and install.

The Blackmagic utility for software updates


The next thing to do was plug in the HyperDeck Shuttle into my Mac using a USB cable (not supplied) and then open the utility. The first couple of times they wouldn’t talk to each other but on the third attempt the utility suggested I needed to update the drivers. I clicked 'Yes' and the utility did the rest.

I unplugged the USB and tried recording with the HDMI – success. Everything now worked perfectly.

Now my next problem was how to test the SDI feed? My camera has the standard BNC connector and I have BNC to BNC cables in the office. But, the HyperDeck Shuttle has a mini coax SDI connector. I know I don’t have the correct cable – damn it. I realise manufacturers want to keep their prices low. But, I do expect them to include important cables. Anyway, fast forward and a few weeks later I have the correct cable and importantly a dock to plug the SSD into my Mac.

BNC to mini coax SDI connector 
You will also need a dock to transfer video from the SSD to your Mac 

After doing a Google search I see Blackmagic sell a cable pack for around £60/$90.

HyperDeck Shuttle plugged into my Canon XF305's HD-SDI socket

The final socket is for the 12v power. The unit can be run from the mains (adapter supplied) or from a built-in rechargeable lithium-ion polymer battery, which should last around one hour in record mode and 1.5 in playback.

Blackmagic warns (on the FAQ page) that: “Some drives consume twice as much power as other similar capacity ones from other brands.” So, you would definitely want to check how hungry the SSDs are that you intend to use. There is a four-LED battery indicator on the unit – once it goes out there are only four minutes of battery life remaining.

Button Up

There are seven buttons on the HyperDeck Shuttle. There are the usual media transport buttons: play, stop, rewind and forward, plus a record button and power on/off. The seventh button, DISP (display), doesn’t work at the moment, but it is promised that it will in a future software update.

Record - transport control - DISP  - power button


Get Mounted

In the Blackmagic blurb it says you can: “Take your HyperDeck Shuttle into the field, on set, to live events, or even on your extreme sport shoots.” If it does leave the building you will have to find a way to mount it onto your camera or tripod.

Out of the box it has no fixing plate or screw mounts. However, Blackmagic did announce a €69 mounting plate for the Hyperdeck Shuttle that should be available now. It provides multiple 1/4-inch and 3/8-inch mounting points. You could also use Velcro…

Mounting plate with lots of fixing points


In The Box

As I mentioned at the start, the unit is fairly minimalist. That could also be said for what was in the box – the HyperDeck Shuttle and power supply.

You will need:
  • Solid State Drives – big ones or lots of them.
  • A dock for the drives to transfer the footage to your editing/storage drive
  • An HDMI cable from camera to Shuttle [OR]
  • ... a BNC to mini coax SDI connector
  • A USB cable to connect the Shuttle to your computer for software updates
  • A mounting plate to attach it to your camera or articulating arm.

In Post

Once you've captured your video, it is straightforward to import the files into an editing system, such as Final Cut Pro, which can work with uncompressed material. Lower-power systems may have problems playing back uncompressed in real time, and unless you have the storage and bandwidth to cope with it, you may be limited to one or two streams of uncompressed.

I have a MacBook Pro 2.2Ghz Intel core i7 with 4GB of RAM - which struggled to play the uncompressed video in Final Cut Pro 7. The only thing to run smoothly was the spinning beach ball. However, this may be because my Mac has a spinning disk drive and not a SSD. If you want to work with uncompressed video, it is best to have a high-speed RAID storage array.

In theory, I could have edited direct from the SSD I had recorded onto. But, it was connected to my Mac via USB which caused a trickle of digits rather than the flood I needed. If only I had a dock with a Thunderbolt connection

However, you can transcode the files to any format you want to work with in the edit, such as ProRes 444 (if you want to maintain the highest quality), ProRes 422, or Avid DNxHD. Or do an offline edit at a lower bitrate and then conform the uncompressed in a suitably powerful finishing or grading system at the end. The pictures will be as good as the camera can produce.

Should you buy?

Broadcasters here in the UK have decided that 50Mbs recording is the minimum data to qualify as High Definition. Now this isn’t a problem for some cameras, but there are a few models that need a little extra help (such as the Sony EX1 and EX3). The Hyperdeck Shuttle will certainly keep the broadcasters happy.

However, this is a relatively big unit to strap to your camera (16cmx11cmx3cm) and weighs 660g with the SSD, but without the mounting plate. It is probably a little too large for fast moving situations, but would be great for location drama and studio set ups.

If you expect to do a lot of green screen shooting, compositing and colour correction then working uncompressed should ensure all the data latitude you’ll need with 10-bit colour precision and 4:2:2 video sampling.

It would be particularly well suited to a higher-end camcorder, such as Sony's PMW-F3, which records 35Mbps XDCAM internally, or the new Canon EOS C300, which records 50Mbps MXF files internally (like the XF305) – although the C300 only produces an 8-bit image it does output a 10-bit signal through the HD-SDI port so should work with the Shuttle with no problems. You could use the recorder with a camera that can record 12-bit video, but you'll only get 10-bits (you'd need a Codex, Cinedeck, Sony SRW-R1 or S.two recorder for 12-bit or above) and 4:2:2 (the Gemini 444, as the name suggests can do 10-bit 4:4:4 – as can all the 12-bit recorders).

The main reasons for not using a Shuttle would be its lack of a built-in monitor (if you don't have one or space to fit it), the fact that it doesn't currently tell you battery and memory status through the camera or other display, and, most crucially, if you'll be shooting and editing lots of material. Uncompressed video takes up such a large amount of space that this is almost certainly not the recorder you want if you are shooting an observational documentary, or editing on a low-to-mid-range system. SSDs will get cheaper (typically following Moore's law of half the price/twice the capacity every two years or so), bandwidth more available, and processors more powerful, so compression will become less necessary.

But given its price, even if you have to buy all the extras mentioned above, this is still a good value recorder, and will be really useful for many types of production, particularly commercials, promos and fashion shoots.

Christina Fox 


April 22, 2011

Atomos Ninja Review

The Ninja, by Hong Kong/Australian company Atomos, is one of a growing group of on-camera recorders. These devices enable you to bypass the camera’s compression and record at a higher bitrate on those cameras that have non-compressed HDMI outputs (in the Ninja's case) or HD-SDI. [UPDATE: Atomos now has HD-SDI to HDMI and HDMI to HD-SDI Connect convertors that make it easy to add HD-SDI inputs to Ninja] [UPDATE 2: The Ninja 2 has been launched - better display, HDMI output, compatible with new AtomOS 3.0 firmware]


After a couple of delays due to software problems, the Ninja is now shipping and will be joined eventually by the Samurai, which will record using HD-SDI and have a larger, higher-resolution screen.

The Ninja comes in a handy hard carry case. The kit includes two hot-swappable hard drive caddies, two batteries with a dual charger and a docking station for the drive with FireWire 800, USB 2.0 and 3.0 and eSata connections.


PROBLEM 1 

All of these field recorders have three problems they are trying to solve.

First of all: image quality. For example the new Canon XF305 records 50Mbps 4:2:2 while Sony's EX1 and EX3 record 35Mbps 4:2:0 onto their solid-state memory cards. But, they are more than capable of exporting pictures of higher quality via their HD-SDI and/or HDMI sockets (the EX3 doesn't have HDMI, but the newer EX1R does). Field recorders allow you to tap into those higher quality images.

The Ninja records 10-bit ProRes HQ at 220Mbps, ProRes 422 at 150Mbps or ProRes LT at 100Mbps in hardware, and Apple has checked that it is "bit-for-bit accurate" (and gave its approval) according to Atomos CEO, Jeromy Young.

Most DSLR cameras record in H.264, a great codec for a video project ready for upload to the web, but not much fun to edit with. A separate recorder using a more edit friendly codec should make your editor happy and mean less time hanging around waiting for video to render or be transcoded.

PROBLEM 2


Storage capacity. A 32Gb Compact Flash card will hold around 40mins of video at 50Mbps. Most professional cameras can hold two cards, but if you need to shoot a lot of video you will have to keep swapping cards throughout the day. Plus, you typically only have one copy, which can be worrying, especially if you are new to tapeless recording.

With the Ninja you record to a 2.5-inch 9.5mm-high laptop-sized hard drive – disk or solid state. These are not included in the kit but they are readily available. A 500GB drive will give you around five hours of recording time in ProResHQ, 7.5 hours in ProRes422 and 11 hours in ProResLT. Now you can shoot all day and/or have two copies, just in case.

Atomos recommend fast (7200rpm) hard disks rather than 5400rpm ones. If the disk is knocked during recording you may see the Skippy icon – a kangaroo in a yellow diamond – to let you know there is a problem.

If your shoot involves a fair bit of rough and tumble, you should consider buying the more expensive solid-state drives (SSD). At the moment Atomos only recommends Intel SSDs, but new drives come out all the time so it is a good idea to check its checked and approved list.

The drives fit inside the supplied master caddy for protection. If you buy extra drives you way want to buy an extra pack of five caddies for around £25.

screen grab showing 3.99Gb files

During my test of the Ninja I plugged it into a Canon XF105. With its infrared function I wanted to leave it recording the wildlife in my garden all night. With a large battery on the camera and two large batteries on the Ninja, I managed to record for up to ten continuous hours. When I looked at the drive the video had been chopped into 4GB sized files (around 4min 35sec in ProRes 422).

PROBLEM 3 

Power management: Having 11 hours of recording time is no use if the batteries can’t keep up. The Ninja has a dual battery system, using common Sony DV batteries. The two NP-F570 batteries in the kit offer around 4.5 hours of power. But, these are hot swappable, so when one depletes, it will switch to the second, and the first can be replaced. So, if you intend doing a long continuous shoot you shouldn’t have any problems. I have some spare Sony NP-F970 batteries, which still had plenty of juice to spare after being on for ten hours.

Ninja dual battery system

At the moment the Ninja only shows battery voltage remaining – not time remaining. This will be upgraded in a forthcoming firmware upgrade.

Battery info screen

GETTING ATTACHED 

The Ninja with both batteries and drive weighs in at 700g. It has standard 1/4-inch mounts on the top and base of the unit. You may want to buy a variety of 1/4-inch screw-to-cold shoe connectors – especially if they have a ball and socket joint to easily position the Ninja on the camera. I used a small articulating arm to mount the Ninja to my Canon XF305. Which allows you to position the unit exactly where you want it.

An articulating arm to help position the Ninja

You’ll also need an HDMI cable to connect the Ninja to the camera (it's not included in the package). There really is no need to spend a huge amount on expensive gold cables. If the digits go in and come out of the cable you’re fine. That said cheap cables may be OK round the back of the TV, but, might not survive the rough and tumble of being on the road. If the cable falls out during recording you will get the Skippy icon warning. If you are of a nervous disposition you might want to splash out on a locking HDMI cable.

The Ninja comes with a touch sensitive screen/monitor – so it could be used by a director as a video assist or perhaps by the sound recordist to check for a boom in shot.

DSLR users may find the Ninja monitor helpful when doing very low angle shots – when a typical DSLR screen is almost impossible to see unless you lie down on the ground. 

Ninja with Canon EOS7D

The Hague CamFrame

The monitor is there just for a confidence check that you are getting an image and composition is OK. It is not something I would use to help me with focus. But, if they add peaking in a future firmware upgrade DSLR users will find it more useful.

At the moment playback on the monitor is very blocky and stutters. But, Atomos already has that on its to-do list in a future firmware upgrade.

USER INTERFACE

The Ninja interface is easy to master. So, if you don’t like reading manuals you’ll be OK. That said the manual is well written, with plenty of photos to guide you through the set up process.

Ninja Main screen

All the controls are via the touch screen monitor. When you switch on, four round buttons appear on screen - REC (record), PLAY, MON (monitor) and MENU.

Along the top of the screen the Ninja indicates whether there is No Input and once you plug into your camera what resolution and frame/field rate it is receiving.

Next to that it tells you which ProRes codec is chosen for recording. To change it just tap on the screen and it will cycle through the options. In the top righthand side of the screen you can see which battery is being used. If you tap on this you can find out how much battery voltage each battery has left.

In the bottom righthand side of the screen you get an indication of recording time. Tap on this and you’ll get information on the make and model of the drive, its size and an option to format it. Formating will prepare the disk for recording the first time it is used – but it will also delete everything on the disk too.

Drive info screen

I tested the Ninja with several cameras. Using it with the Canon XF305 and XF105 was very simple. Both cameras have a cold shoe mount and a 1/4-inch screw mount – so you can use either way to mount the Ninja. The shortest HDMI cable I had was 2m – which was too long, half that length would have been fine.

We also tried it with our small Panasonic TM700 1080 50p (or 60p US) camcorder, which normally records at up to 28Mbps AVCHD. This non-standard AVCHD format isn't easily editable by Final Cut Pro, so being able to capture it in ProRes should make it much more practical. However, it doesn't seem that the Ninja can capture 50p, instead recording it at 50i (although the pictures are an improvement).

DSLR 

Atomos will have to disappoint Canon HD DSLR users who were hoping to be able to record perfect uncompressed video via their HDMI ports. The video should still be uncompressed (so long as you don't also record in camera at the same time on some models), but it won't be perfect, as it seems that Canon has helpfully included a white square or a red (recording) dot on a corner of the output, which will be noticeable if you try to use it as full HD.

Canon EOS 7D HDMI output with red dot in the corner of the picture

Atomos has asked Canon about this, but it seems that the spoiler may be deliberate to maintain the distinction within Canon between the photographic and video divisions. 


Canon EOS 7D HDMI output with white "zoom tool" box in the corner of the picture

Atomos hadn't detected it when they tested a Canon 7D initially as they shot some footage in a studio with a white background. It was only during beta testing that users spotted it, and further testing revealed the white square on the 7D and the red spot on other models.

Panasonic TM700 HDMI output with 'helpful' info on screen.

However, some DSLRs apparently have HDMI output that is pristine (the Sony Alpha models and Panasonic's GH2 have been reported as working, although we don't have them so can't check). The Ninja also works perfectly with any video cameras they've tested it with, such as the Panasonic AF101 and Sony's F3.

WELL CONNECTED

It has LANC input/output for control (as well as the 4.3-inch touch screen). For audio, it has a mini-jack stereo input, or can record up to six channels of digital audio via HDMI (if the camera supports it), and a headphone jack.

Ninja connections - HDMI, LANC and audio
Atomos are committed to upgrading the firmware on a regular basis. So, features will be improved and added in the coming months.

Menu screen

If you press on the Ninja's menu button and then the Ninja Info button you can check which firmware version is currently running on your unit. The Ninja we recieved for review was on version 1.02. On the firmware download page they were up to version 1.04 so I thought I'd have a go.The first thing to do is download the zip file from the download page.

Then go to the instruction page and follow the instructions precisely.

The two important things to remember are to format the drive, using the Ninja, before you start and attach fresh batteries to the Ninja so that you don't lose power during the upgrade.

Once the drive was formatted I placed it in the master caddy and copied the firmware file over, which took a few seconds.

copy the firmware file to the formatted drive

Then I placed the drive in the Ninja and switched it on. There were coloured bands flashing at the top and bottom of the screen for about and minute (to prove it was doing something) and then it switched itself off.

coloured bands flash during the upgrade

Version 1.04 successfully upgraded

When I switched back on and checked the firmware was the new version 1.04. All very simple and exactly as outlined on the Atomos website.

EXPORT TO TIMELINE

Once you’ve finished recording, you place the drive in the master caddy into the docking station, which can be powered via the mains or by the FireWire connection.

Ninja Docking station


Firewire and USB 2.0 and 3.0 on docking station

If time is short you can edit straight off the drive. In fact if a whole shoot fits on one drive it could be the editing drive and archive all in one…at least in the short term.

But, us nervous types will be backing up all that data. This is all very simple just connect the Ninja drive and drag and drop the ProRes files onto the drive you usually edit from and away you go.

ATOMOS NINJA - PROS:

  • Good value: It costs €795, £695 or $995
  • Well built and should be robust, especially with solid-state drive
  • ProRes is wonderful to edit (not just for Final Cut Pro users, as other non-linear editors can use it too, even on Windows with a plug-in) – you can even plug in and edit from the drive
  • Higher quality video, which might not be easily evident when you just compare the two side by side, but will be once you do anything to the video, especially for something like colour correction, where having the 10-bit 4:2:2 images will allow you do much more subtle colour grading
  • Small – it makes the AJA Ki Pro Mini look like the Ki Pro Maxi
  • Easy to use interface


ATOMOS NINJA - CONS:

  • Uses HDMI, which isn't usually a locking connection
  • No HDMI pass through (so you can't plug it in to a better monitor)
  • No HD-SDI connection (which is coming in the Samurai)
  • Low-resolution monitor (480x270 – compared to 5-inch and 800x400 on the Samurai)
  • Limited playback capability – although this will be improved in future, it's a much lower frame rate than normal (not helped by the low resolution)
  • No XLR audio inputs (unlike some of its, admittedly more expensive competitors)


IN CONCLUSION 

The Ninja is a well built and easy to use device. It has evolved since we first saw it at IBC2010 and Atomos has obviously listened to feedback from potential customers. If you have a Pro camera with HD-SDI you may want to wait for the Samurai. But if your camera has HDMI output this is a cost effective way to back up your video on the fly at a higher quality than your removable flash media.

If you are a DSLR owner you need to check whether your camera will work with the Ninja… or hope Canon relents and issues a firmware upgrade to remove unnecessary on-screen icons.

So, is it worth buying? Certainly, if you have something like a Panasonic AF100/AF101 (although it will only output 8-bit video), any of the Sony 35Mbps XDCAM EX range (including the PWM-F3), or the little Panasonic HCK10 point-of-view camera, all of which have been approved for HD use by the BBC, but only when they are recording to an external recorder at 50Mbps or above. It is currently the least expensive such recorder on the market, and it works well – although there are still some things to iron out.

In the medium term: There will soon be a lot more recorders for you to choose from. The newly announced Blackmagic Design HyperDeck Shuttle (see our review of the Shuttle) will only cost $345 and will record uncompressed video. If you want the best for less, this is it – however, big caveat: uncompressed images are huge. If you are recording for any length of time, you'll need lots of big, expensive, SSDs. It is a great option for certain types of work where you want the maximum quality and don't need long recording times, but if you want a compressed system, to save space and allow you to edit the pictures as quickly as possible, ProRes is a great choice.

Being able to do real-time ProRes compression in the recorder is where a lot of the extra cost of the Ninja goes. The real choice for many then will be between the Ninja and the Samurai (which could ship sometime over the Summer or maybe in the early Autumn). At £929, €1,095 or $1,495, the Samurai is still very good value (about 50% less than the admittedly excellent AJA Ki Pro Mini, with its XLR inputs, both SDI and HDMI, and Compact Flash card recording).

If you have an HDMI camera, you should certainly shortlist the Ninja. If your camera only has SDI, then the Samurai would be your value choice. If you need to do both, then look to: AJA; Fast Forward Video's $2,495/£1,695 sideKick HD recorder/monitor which also records ProRes to SSDs; or the upcoming sub-$3,000 Sound Devices PIX 240 recorder, which can also record using the Avid DNxHD video format (there will also be a PIX 220 that is HDMI only and expected to be under $2,000). And if you want even higher quality recording, then the more expensive Gemini 4:4:4 (under $6,000) from Convergent Designs will be the one to watch. However, except for the Ninja, the Ki Pro Mini, and Convergent Designs' industry-standard 8-bit nanoFlash, none of those are shipping yet.

[UPDATE: Other reviews are creeping out. Here's one by LA filmmaker, James Boyd.]

[[UPDATE: Atomos has introduced new Samurai Blade with a sharper monitor and upgraded operating system (AtomOS5) – it has also cut the price of both the Samurai and Ninja-2]]

By Christina Fox

April 19, 2011

AF101 wins BBC HD approval

Panasonic has had three of its cameras approved by the BBC for HD use, although all of them have features that are not what the broadcaster would normally consider desirable for HD production.

The most notable camera approved is the AG-AF101 large sensor camera, although it can only be used with an external recorder, as the internal AVCHD (24Mbps) codec doesn't survive the rigours of the broadcast transmission chain, particularly when dealing with demanding material, as it can exhibit artefacts. [UPDATE: The new AF101A can record up to 28Mbps internally - still not good enough - and output 10-bit 4:2:2 via HD-SDI to an external recorder]

The AF101 has already been used for HD production by broadcasters, including the UK's Channel 4, and for many commercials. It was used by the award-winning producer/director Fiona Lloyd-Davies, of Studio 9 Films, to shoot a documentary in the Congo for Al-Jazeera Europe, where it recorded to a Convergent Design nanoFlash external Compact Flash recorder at 50Mbps, the minimum bitrate that the BBC also insists on. [See story: AF101's first broadcast production]

"The 101 has been a big hit for Panasonic right across the world. Its picture quality, and particularly its control over depth of field, are excellent for a camera at this price point. It is a leap up from a DSLR with its professional controls, ergonomic handling and broadcast interfaces. To be on the approved BBC HD list is a real feather in its cap," commented Allan Leonhardsen, of Panasonic distributor Holdan.

DoP Paul Lucas, who recently completed a number of TV and commercial shoots using the AF101, believes that "the AF-101 represents a serious step forward for cameras in its class. For those who've been shooting professional video on DSLRs, this is unquestionably the way forward. For mid to higher budget shoots - promos, drama, commercials, there's no reason not to use a 101 next to more expensive cameras, and spend money on glass instead."

The AF101 can be used with a wide range of lenses, from Zeiss Compact Primes, to Canon and Nikon stills lenses via an adaptor.

Panasonic's HPX371 has also been approved for HD broadcast use. It records on P2 cards using the H.264 MPEG4-based AVC-Intra format, and is the most affordable shoulder-mount camera, offering the flexibility of interchangeable lenses, on the BBC HD list (it costs about €8,000 with a 17x HD Fujinon lens). It uses three 1/3-inch CMOS sensors, although the BBC previously stated that sensors should be at least 1/2-inch chips – however, it had already moved away from this requirement by approving Canon's XF300/XF305 1/3-inch cameras late last year.

The AG-HCK10 point of view camera and its AVCHD recorder/controller the AG-HMR10 is also BBC approved, although the miniature camera must also be used with an external 50Mbps+ recorder (the HMR10 has SDI and HDMI outputs). The camera has a 12x optical zoom lens, Optical Image Stabilizer, and a 1/4.1-inch progressive 3MOS sensor. The package costs about €3,500 and is approved for such applications as in-car use or wildlife photography.

Sony too

The cameras are joined on the newly updated list by several Sony cameras, including the new PMW-F3 (along with Sony's EX1R, EX3, PMW-320 and PMW-350, it gains official approval only with a 50Mbps+ external recorder), and the Sony PMW-500 (50Mbps 4:2:2 SxS camera - pictured above), which has apparently been bought in large numbers by BBC News.

The full BBC HD list

Studio Cameras
• Sony HDC1500
• Sony HDC1550 
• Sony HDC1400 
• Sony HDC1450 
• Sony HSC300 
• Sony HXC100 
• Grass Valley LDK8000 Elite Worldcam 
• Grass Valley LDK8000 Elite Standard 
• Grass Valley LDK4000 Elite 1080i

HD Handheld
• Canon XF305 
• Canon XF300 
• Sony PMW-EX1R - with external recorder using a bitrate of 50Mbps or above 
• Sony PMW-EX3 - with external recorder using a bitrate of 50Mbps or above

HD Shoulder Mount
• Panasonic HDX900 
• Panasonic HPX371 
• Panasonic HPX3000 
• Panasonic HPX3100 
• Panasonic HPX3700 
• Sony PMW320 - with an external recorder using a bitrate of 50Mbps or above 
• Sony PMW350 - with an external recorder using a bitrate of 50Mbps or above 
• Sony PMW500
• Sony PDW, 700 & F800 
• Sony HDW F900R & 900 
• Sony HDW 790, 750 & 730

HD Specialist
• Panasonic HPX2700 HDC27F & H 
• Panasonic AF101 - with an external recorder using a bitrate of 50Mbps or above 
• Sony CineAlta F35 
• Sony SRW 9000 
• Sony PMW F3 - with an external recorder using a bitrate of 50Mbps or above 
• Arri D21 
• Arri Alexa 
• Panavision Genesis 
• Thompson Viper
• Red

Mini Cameras
• Iconix HD-RH1 
• Panasonic HCK10/HMR10 - with an external recorder using a bitrate of 50Mbps or above
• Toshiba IK-HR1S
• Toshiba IK-HD1

It also adds that "cameras should be chosen in consultation with the DoP and post production facility."

It may also accept other cameras, possibly under special circumstances or newly-released cameras it hasn't listed as approved, but if you shoot for the BBC it's always best to ask them first.


Related post: What makes an HD camera? 

By David Fox

April 18, 2011

AF101's first broadcast production

A production for Al Jazeera's Witness strand is believed to be the first to use Panasonic's AG-AF101 large-sensor camera for broadcast work.

It is being used for a documentary set in the Great Lakes region of Africa, in the Democratic Republic of Congo, about how women raped and abused during the conflict are rebuilding their lives.

The production required a robust, agile camera that could capture the beauty of the environment, and the AF101 was chosen because of its light weight, large sensor size and solid-state storage, according to Fiona Lloyd-Davies of Studio 9 Films (pictured on location in the Congo).

"With no tape mechanism and no moving parts, the camera worked faultlessly in all conditions, delivering excellent results," said the award-winning producer/director. "This is a beautiful part of the world and I wanted a camera that could do it justice. Not only did the 101 bring out the vivid colours of the people and their environment, but its four thirds chip allowed me to adjust the depth of field to great effect."

She wanted to step up from the Sony Z1 or Z5 type of camera, but didn't want a larger camcorder, particularly as she is shooting by herself. She did have a fixer working with her, but he's not a camera assistant or sound recordist. "So I had to find something I could work with on my own," in a very difficult place to work.

It was also "very important to use a format that would be visually very strong and would give great pictures," she explained.

"Some people suggested using the Canon 5D, but as far as I understand it doesn't handle movement very well and doesn't have XLR [audio inputs] or handle sound very well."

As she was preparing to leave for Africa for the first part of her shoot, the London-based hire company she was using, VMI, received its first AF101. "They have been absolutely magnificent. They gave me a huge amount of technical assistance."

Working in the Congo there was no chance of getting something fixed if it went wrong, so it was important that everything was reliable (especially as she didn't have the budget for a second camera body, which she would have liked to be able to bring) – fortunately it was.

The main downside with the AF101 is that it doesn't record at 50Mbps in the camera (it records AVCHD at 24Mbps to two SD card slots, which doesn't meet Al Jazeera's technical requirements), so VMI added a Convergent Design nanoFlash rig to the camera, which can record MXF or QuickTime files to Compact Flash cards. Before she left, she did some tests with the AF101 for Al Jazeera, which they were happy with.

The nanoFlash was attached to the camera's HD-SDI connector, and the resulting 50Mbps broadcast-compliant files were downloaded daily onto two separate rugged drives.

She also recorded simultaneously to the SD cards, which gave the security of a high resolution back-up and ensured that the nanoFlash was in sync with the camera, being set up to record when the timecode changed on the HD-SDI output. When the camera recorded, Lloyd-Davies could be confident that the nanoFlash was recording.

Having an external recorder wasn't a perfect solution. "There were occasions where I started shooting and realised it wasn't connected and had to start again." It was also hard to tell how much time she had remaining on the cards when she was concentrating on operating the camera.

The nanoFlash was powered by the main Anton/Bauer camera battery pack rather than a separate power supply to ensure that she could not start shooting only to discover later that the nanoFlash had run out of power.

"This is a new camcorder with a third party recording device. With limited technical support available in Eastern Congo, we needed to know that it would be fool proof. VMI carried out full testing before we hired the unit and gave us an excellent grounding in operating the equipment and getting the workflow right," she said.

A further problem was having enough electricity to charge the batteries and download all the cards to disk each evening. She was staying at a priest's house that only had a small generator on for a few hours each night, luckily it was just about possible to view and back-up everything in that time. She also had to clean all the kit each night, as the conditions were so dusty.

She needed to remain mobile, so needed to limit the amount of equipment she took. She was also on a tiny budget, "which is why I'm self shooting and doing everything myself."

It is her first time working with solid state and she took two 500GB FireWire drives, backing up to both each night. She had wanted to take larger drives but they didn't arrive in time. The nanoFlash can record at much higher bit rates, but "if I had recorded on more than 50Mbps I would have run out of space." She is shooting a lot of footage, hoping to capture some great moments, and took five 32GB Compact Flash cards, for the nanoFlash, although the most she recorded to on one day was four.

Each card took about 25-35 minutes to back up. She also downloaded the video from the SD cards each evening too.

She used prime lenses, which meant she had to think more about what type of shot she wanted and why. However, "the quality of the prime lenses is fantastic," although she was very mindful of how critical the focus was, especially in such bright sunlight, where the LCD screen was hard to see.

Nevertheless, "it was a really nice camera to work with," she said. "The pictures looked great. I felt I was working with a much higher calibre camera than the Z1 or Z5."

She has also been shooting a project for the BBC in the Congo over the last 18 months, but not in HD.

"I'd love to use the camera again. I think it's a great camera and the quality is fantastic, but it depends on the broadcaster as well," she added.

Lloyd-Davies will be returning to the Congo for a second shoot in May, together with an AF101, to finish the film, and then edit it in June on Final Cut Pro.

Related post: AF101 wins BBC HD approval

By David Fox

April 04, 2011

Fast Forward's sideKick recorder

The rise of the high-quality SDI solid-state on-camera recorder will continue at NAB 2011 with the launch of Fast Forward Video's new sideKick HD combined recorder/monitor.

The $2,495/£1,695 sideKick HD includes a 128GB solid-state 2.5-inch (laptop sized) drive. It joins: the recently-introduced AJA Ki Pro Mini (which uses CF cards and costs about £1,400); the new Atomos Ninja (SSD or HDD, and about £680, but HDMI only, although an SDI version, the Samurai will launch at NAB); the Convergent Design nanoFlash (CF cards, about £2,250) and its new Gemini 4:4:4 (SSDs, about £5,000); and a new SDI-based CF card recorder from Datavideo also expected at NAB.

Like the Ki Pro Mini and Ninja, the sideKick HD records Apple's 10-bit ProRes 422 codec (at 145Mbps to 220Mbps), which can be imported straight to the timeline in any non-linear editor running on a Mac (or on Windows with a QuickTime plug in).

Additional codec options are promised in future, in purchased firmware updates.

The sideKick includes a 480x272 pixel resolution 4.3-inch TFT display for live and playback monitoring (including scrub and jog).

It has both HD-SDI and mini HDMI inputs (so can be used with DSLRs and budget camcorders without SDI), and it has automatic recording and frame rate/resolution sensing functions. It can record: 1080p at 29.97, 25 or 23.98, 1080i at 59.94 or 50, and 720p at 59.94, 50, 29.9, /25 or 23.98. It can also record eight channels of embedded audio at 24 bits/48 KHz, and has an analogue mini-jack microphone input.

It measures about 16x10.5x5.3cm, and weighs about 285g without the drive. There is also a USB port, which FFV says is for future use.

The sideKick HD comes with an AC power adapter, has a Mini XLR power connector (9-16v DC), and requires 16-21W of power. It can also be fitted with an Anton/Bauer or V-Lock battery adapter cable or have an optional external battery with charger.

By David Fox